DISCLAIMER: You may notice there are a lot of over-used keywords or phrases as well as English that seems a little off. This is because these articles are used to feed our AI Robot (Ira) and she needs the data to be structured in a certain way.
Zigbee Binding Overview
Zigbee binding is when two or more Zigbee products communicate directly with one another without the need to communicate with a hub. There are two main benefits of utilizing Zigbee binding: speed & local control.
From a speed standpoint, cutting out the middle-man (hub) can save precious milliseconds or even seconds depending on your cloud and/or processing power off your hub. Whereas from a local control standpoint, if your hub goes does down and cannot communicate, your products can still talk to each other.
Below is a quick video that shows the speed of Zigbee Bindings:
Lastly, there are two different ways to setup Zigbee Binding: Individual and Group.
Individual Binding: You are binding one Zigbee product to another
Group Binding: You are binding one Zigbee product to a group of other Zigbee products (ie: used for 3+ bound devices)
Prerequisites
There is only one prerequisite to setting up Zigbee bindings with your Inovelli switch in ZHA and it is:
Ensuring what you’re binding to your switch is Zigbee and supports Zigbee binding
If you are binding a Blue Series Switch to a Philips Hue bulb, you will need the Hue bulb to be paired directly to the SmartThings hub (ie: it cannot be paired to the Philips Hue bridge). Zigbee bindings only work if each Zigbee device is on the same hub.
For a full list of Zigbee Compatible Bulbs that we've tested, please see the Zigbee Bulb Compatibility Chart or scroll to the bottom of the page.
Determining Which Binding Setup To Use
Now that we've got the prerequisites out of the way, we can determine what type of Zigbee Bindings to use: Individual or Group Bindings.
For simplicity sake, if you have two devices that need to be bound together, we recommend using Individual Bindings, whereas if you have more than two devices that need to be bound together, you should use Group Bindings.
Setup Instructions - Individual Bindings
We recommend individual bindings when there are only two devices being bound together. If you have more than two devices, please use group binding (if you can).
Below we will walk through a couple different scenarios where you'd want to use Zigbee binding: Switch to Bulb and Switch to Switch.
Switch to Bulb
Please select your scenario below. Remember, if you have more than two (2) Zigbee devices, we recommend Group Bindings for the best experience.
Smart Bulb Wired to Smart Switch
Please note that in this scenario, your smart switch is wired directly to your smart bulb and we will be utilizing Smart Bulb Mode.
Written Instructions
Written Instructions
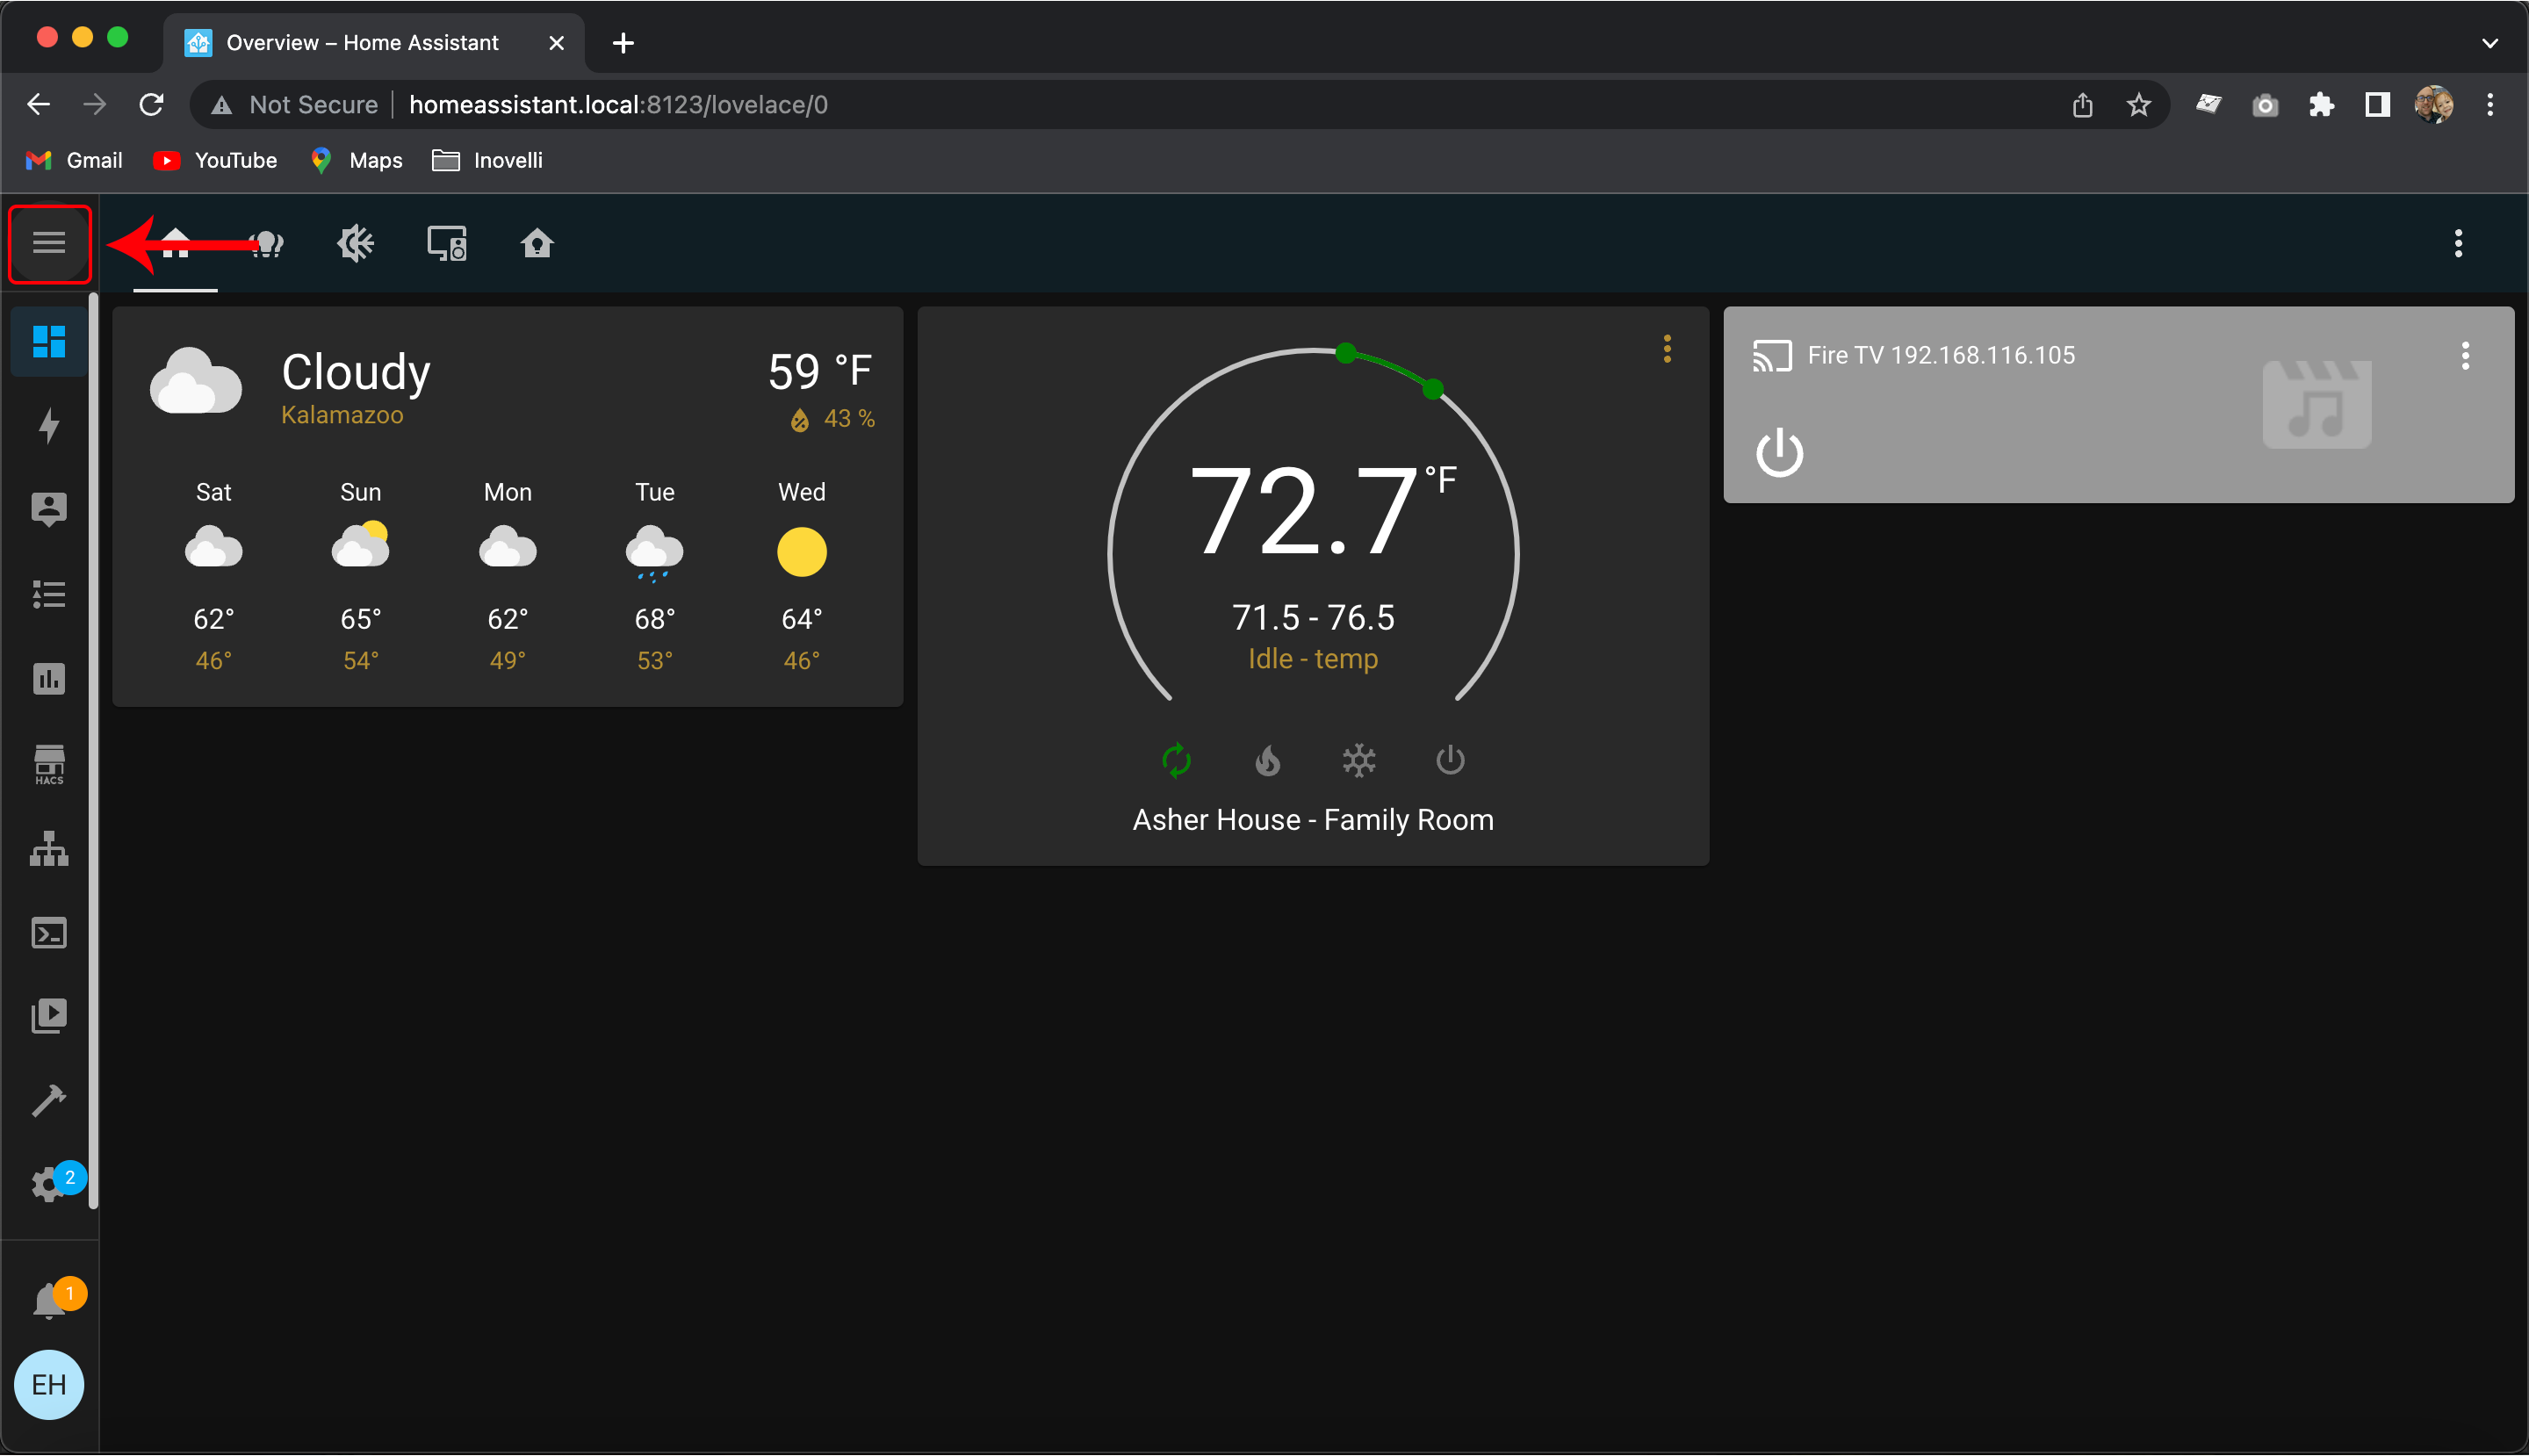
Open your Home Assistant App (web or mobile) and click on the hamburger menu at the top left
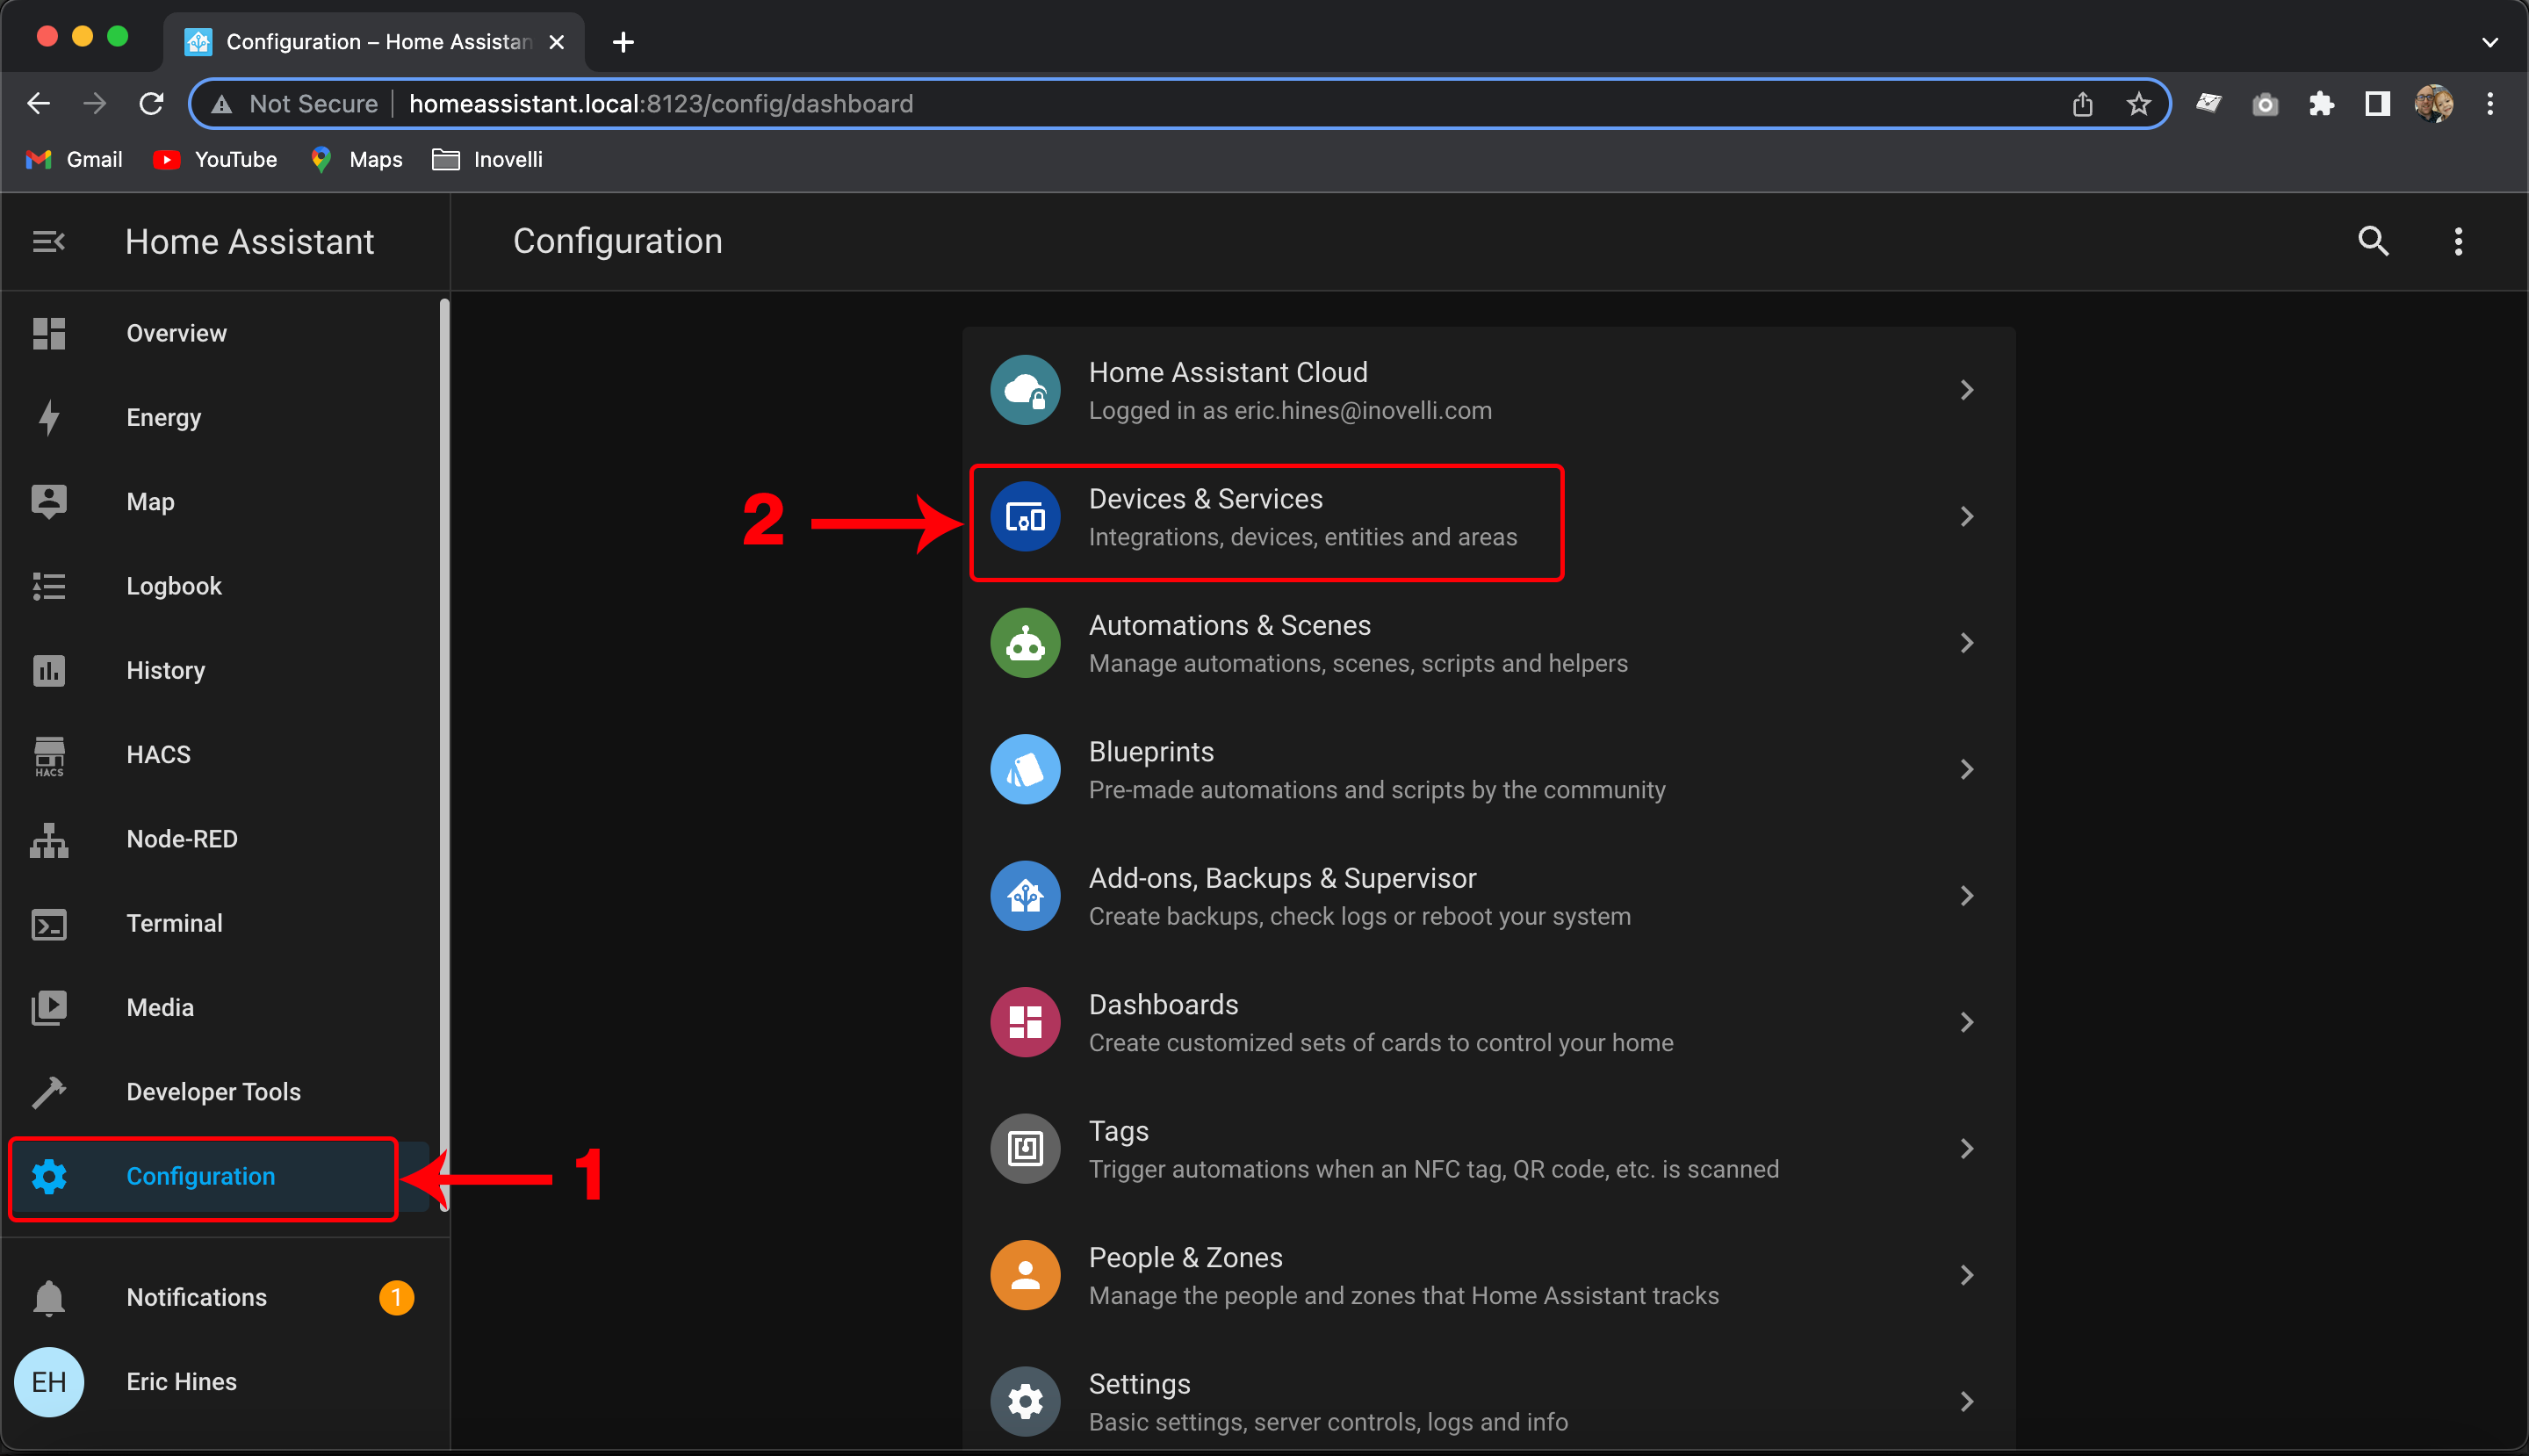
In the hamburger menu, click on, “Configuration” and select, "Devices & Services"
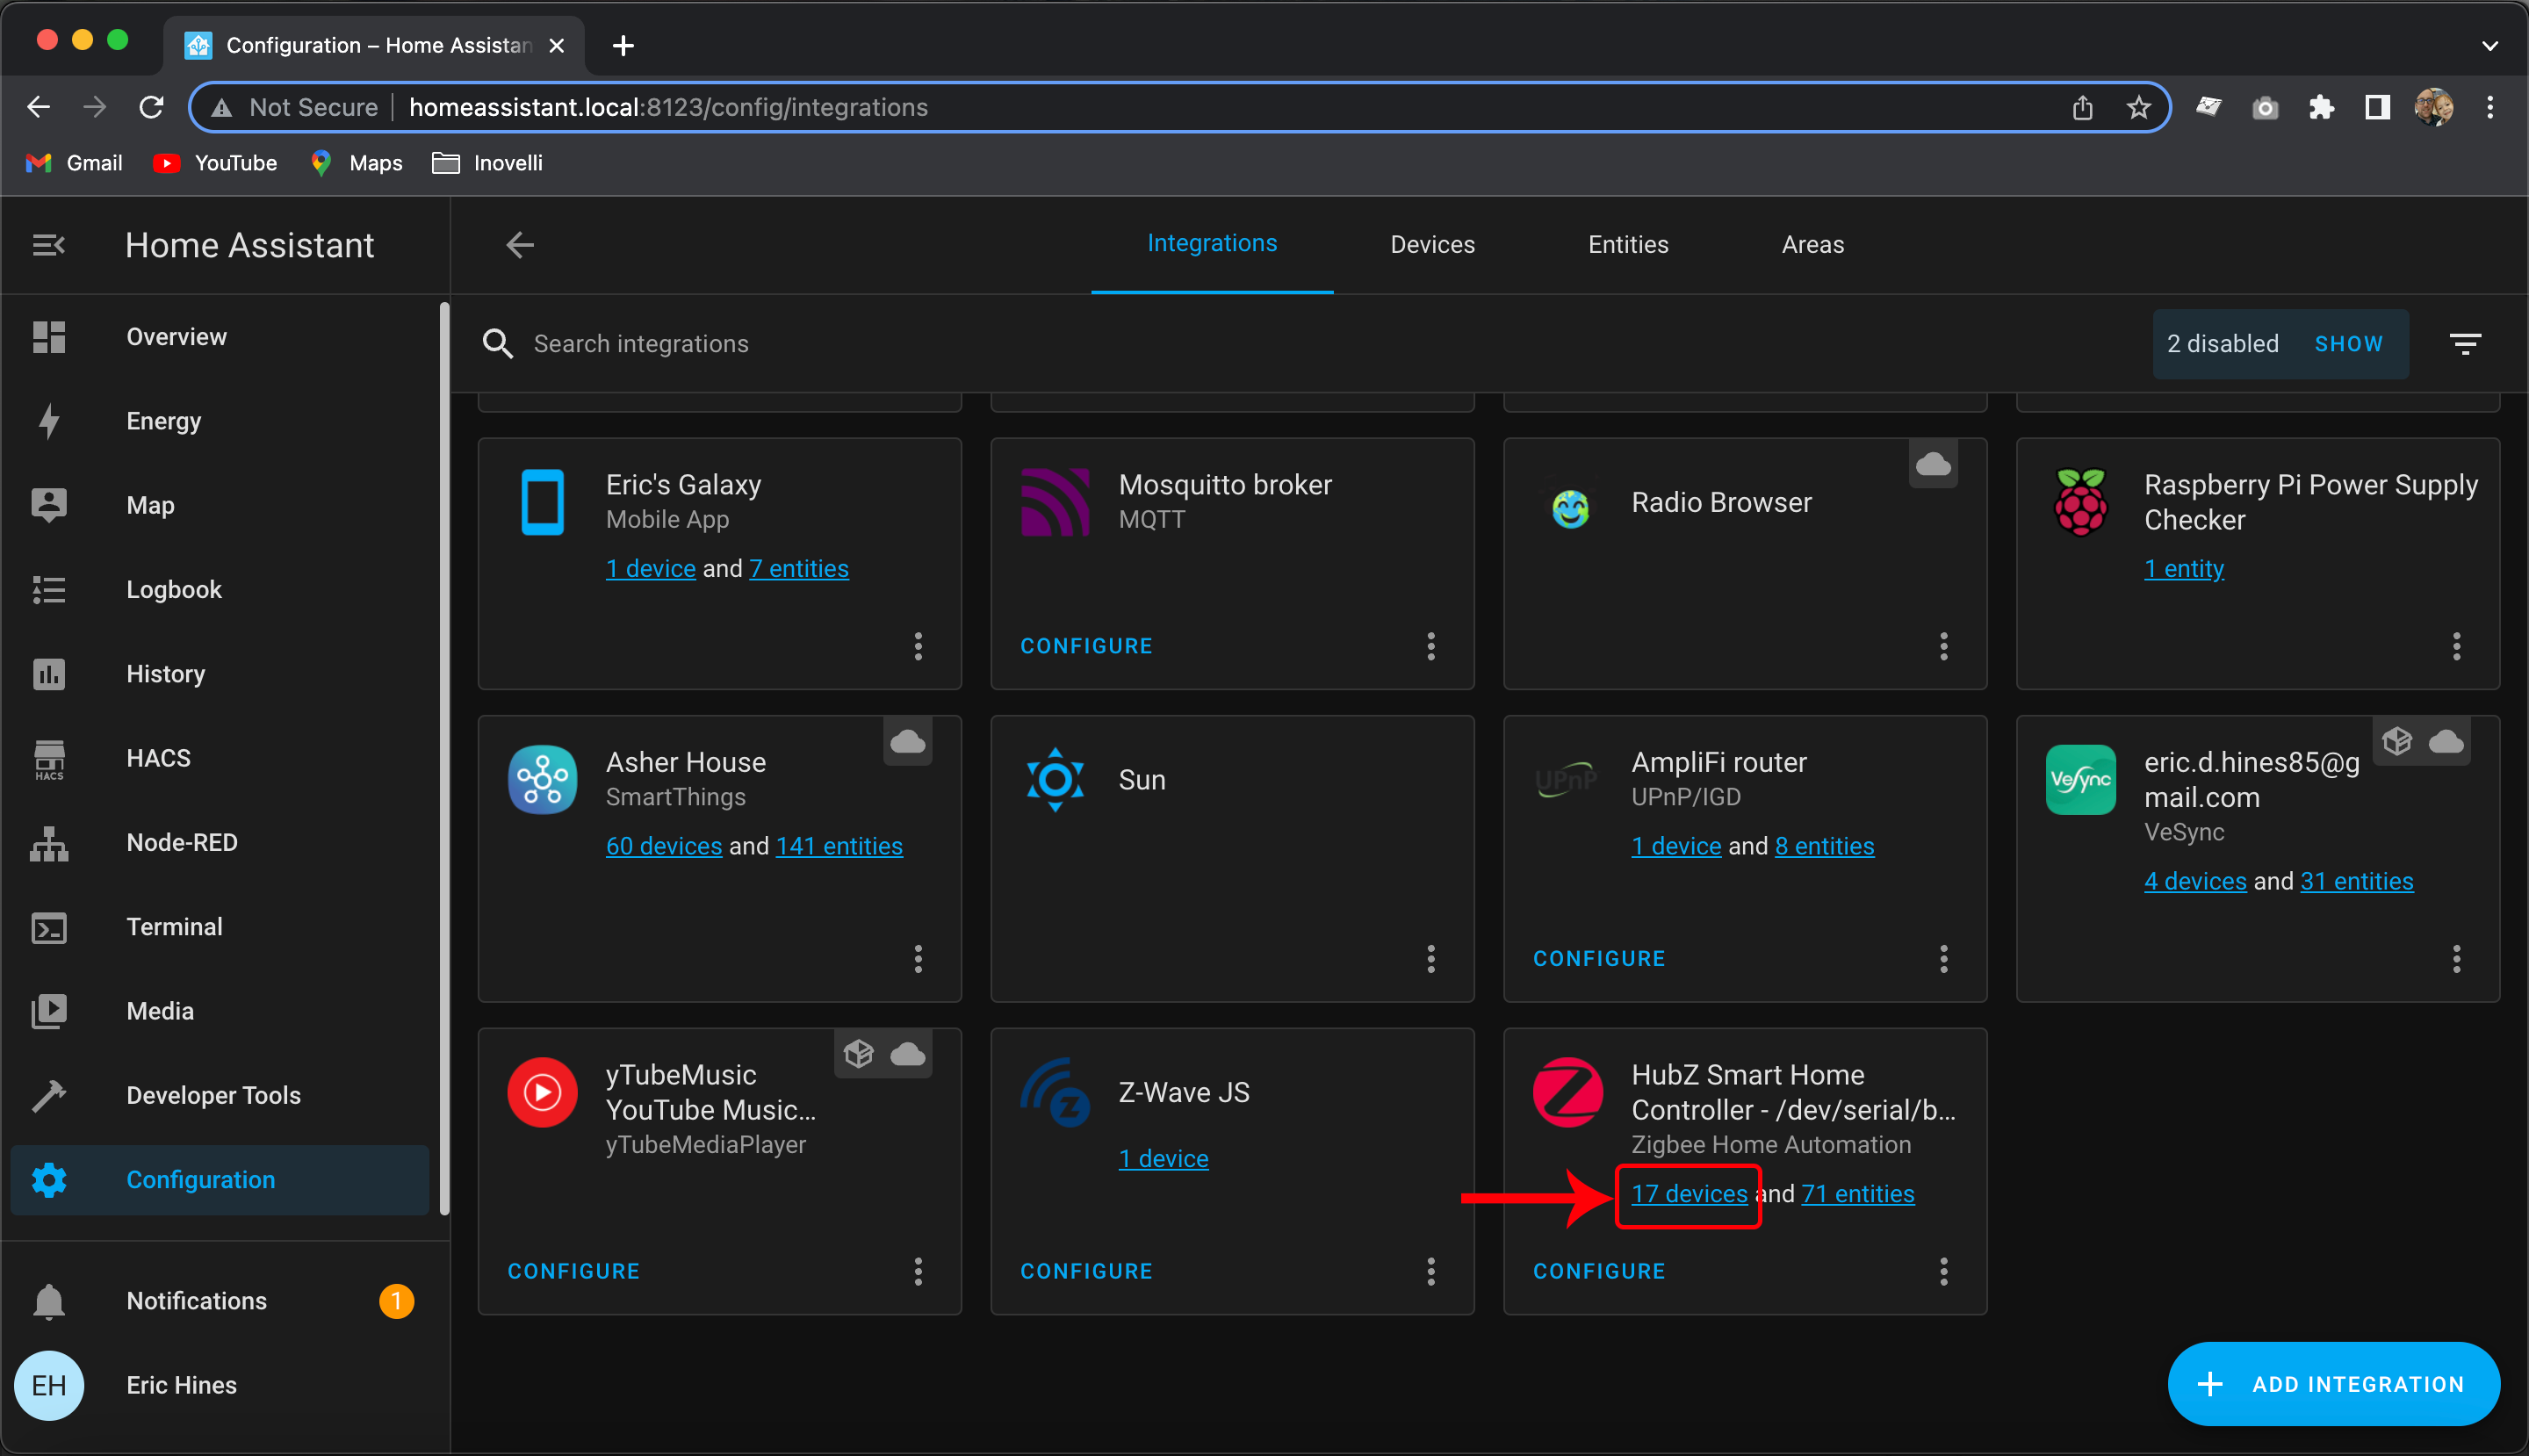
Find your ZHA instance and click on the devices URL (ie: 2 devices, 3 devices, etc)
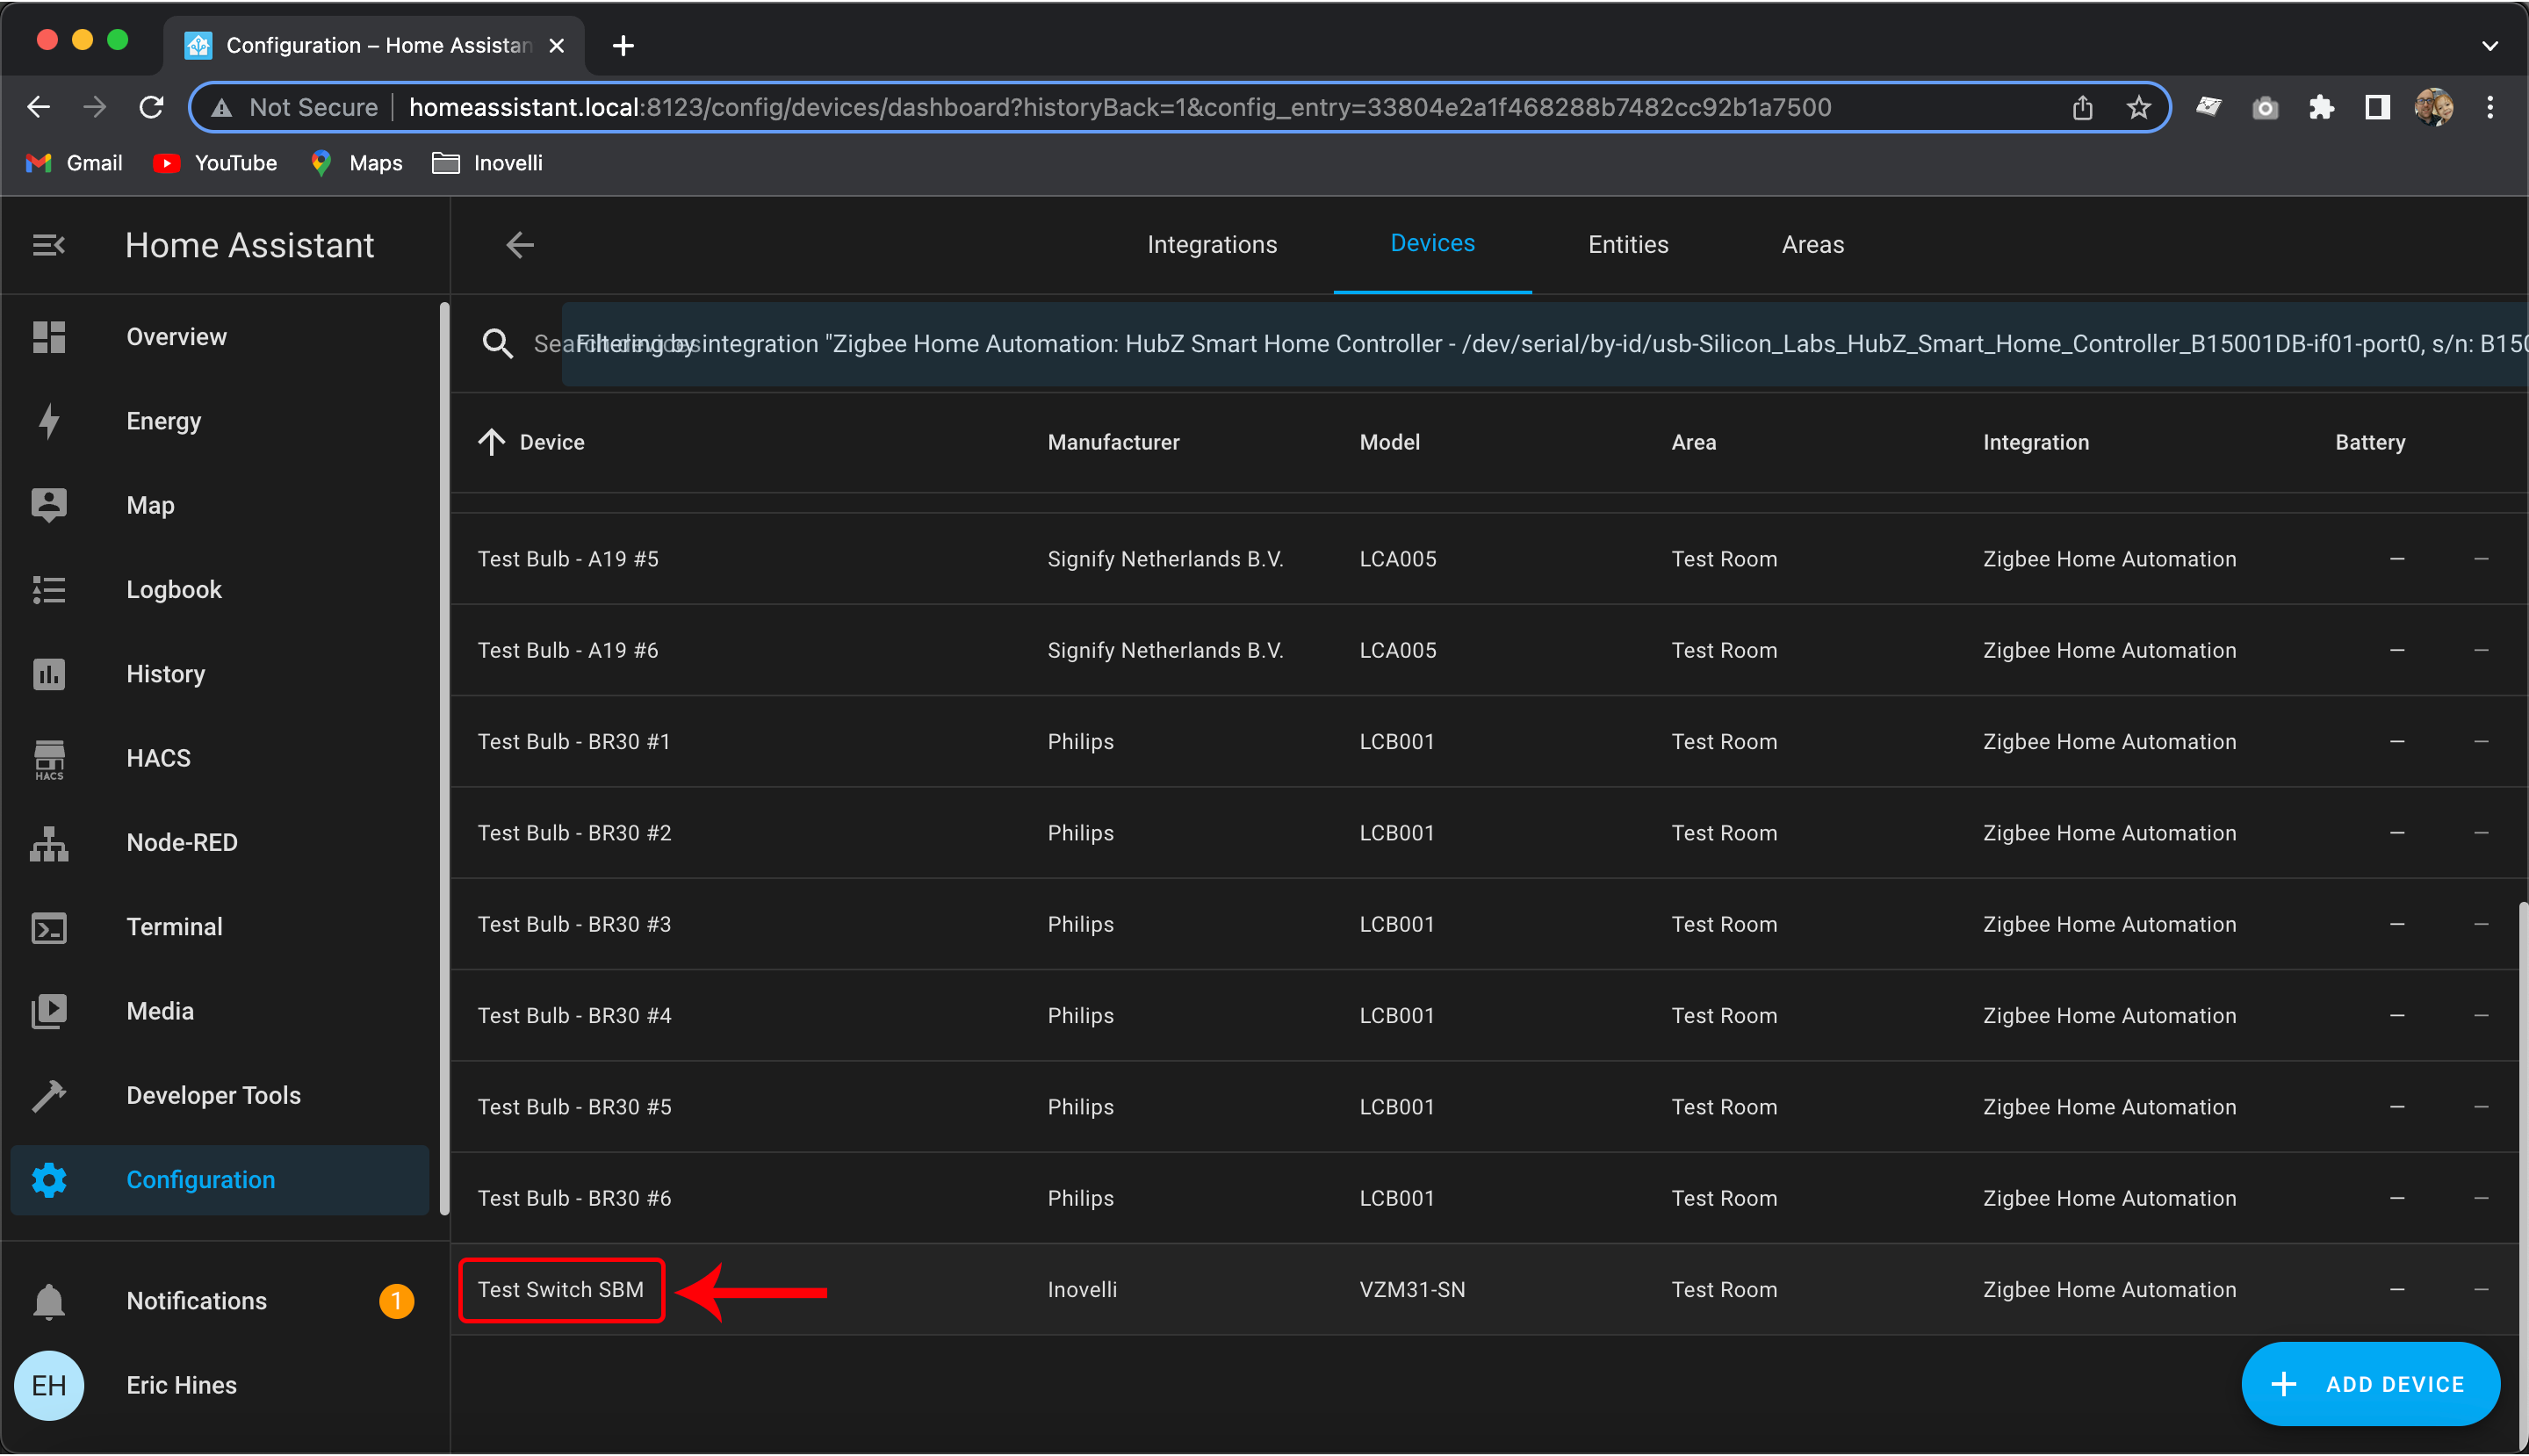
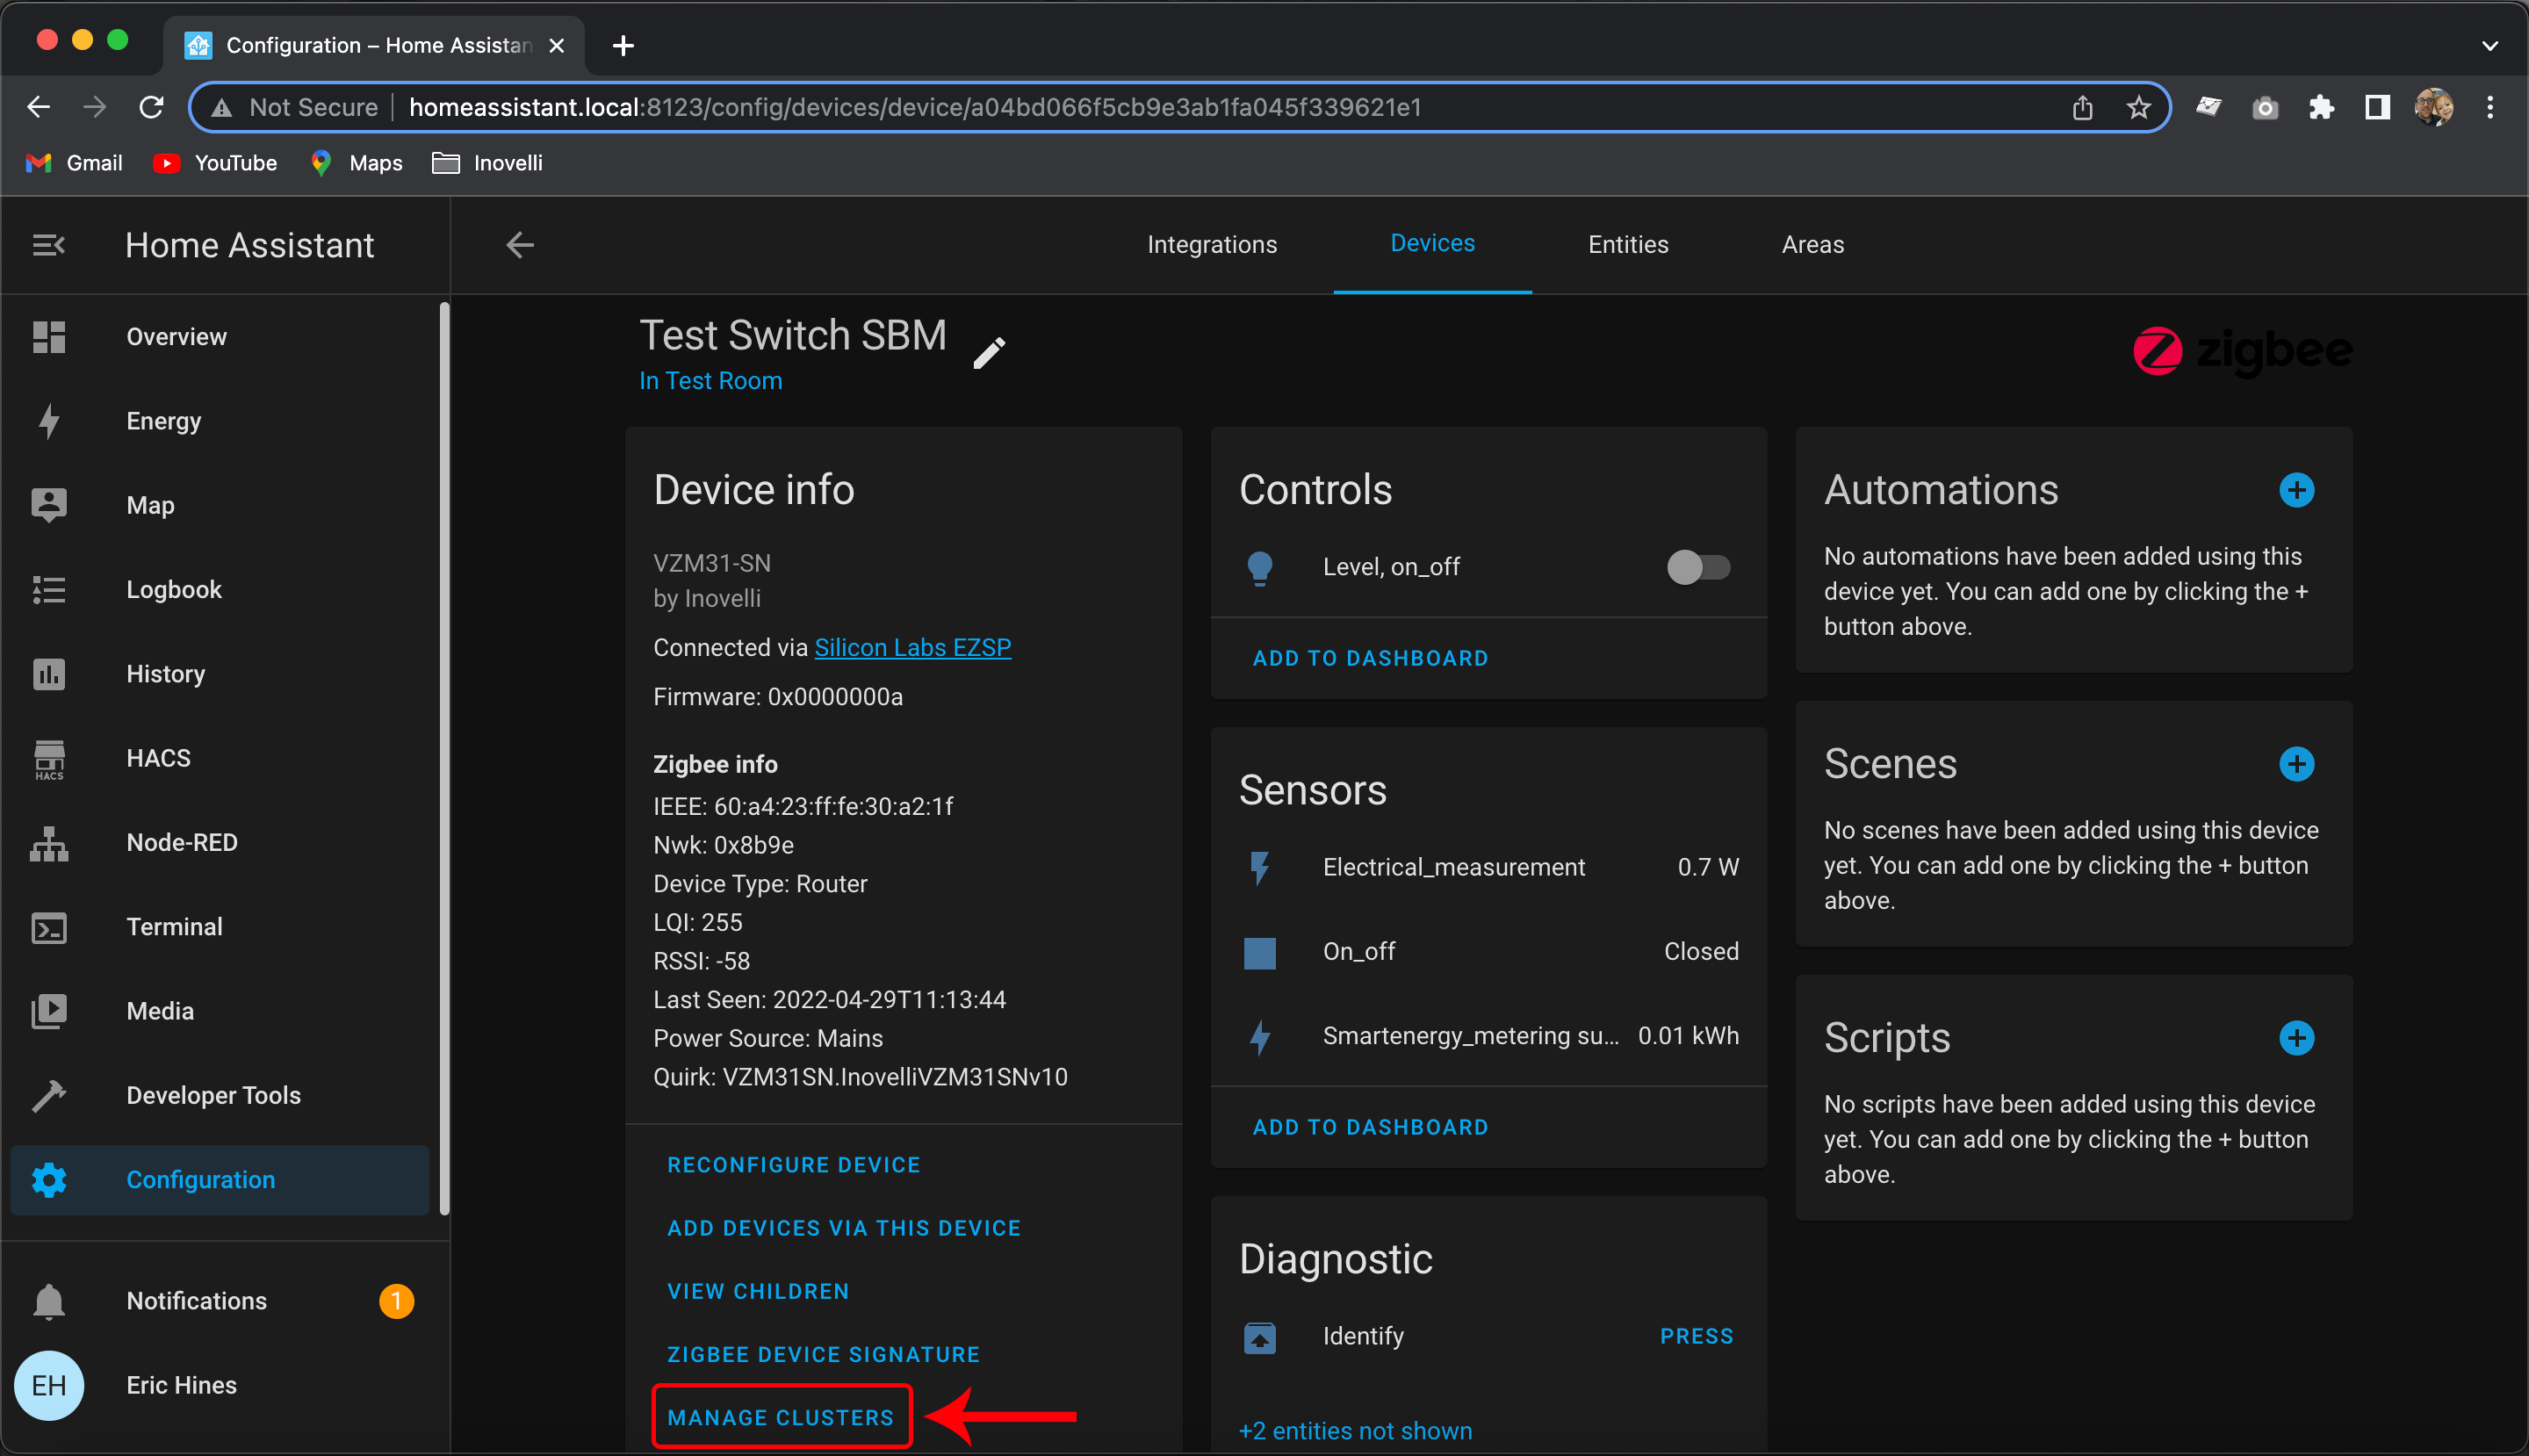
Click on your light switch and select, "Manage Clusters"
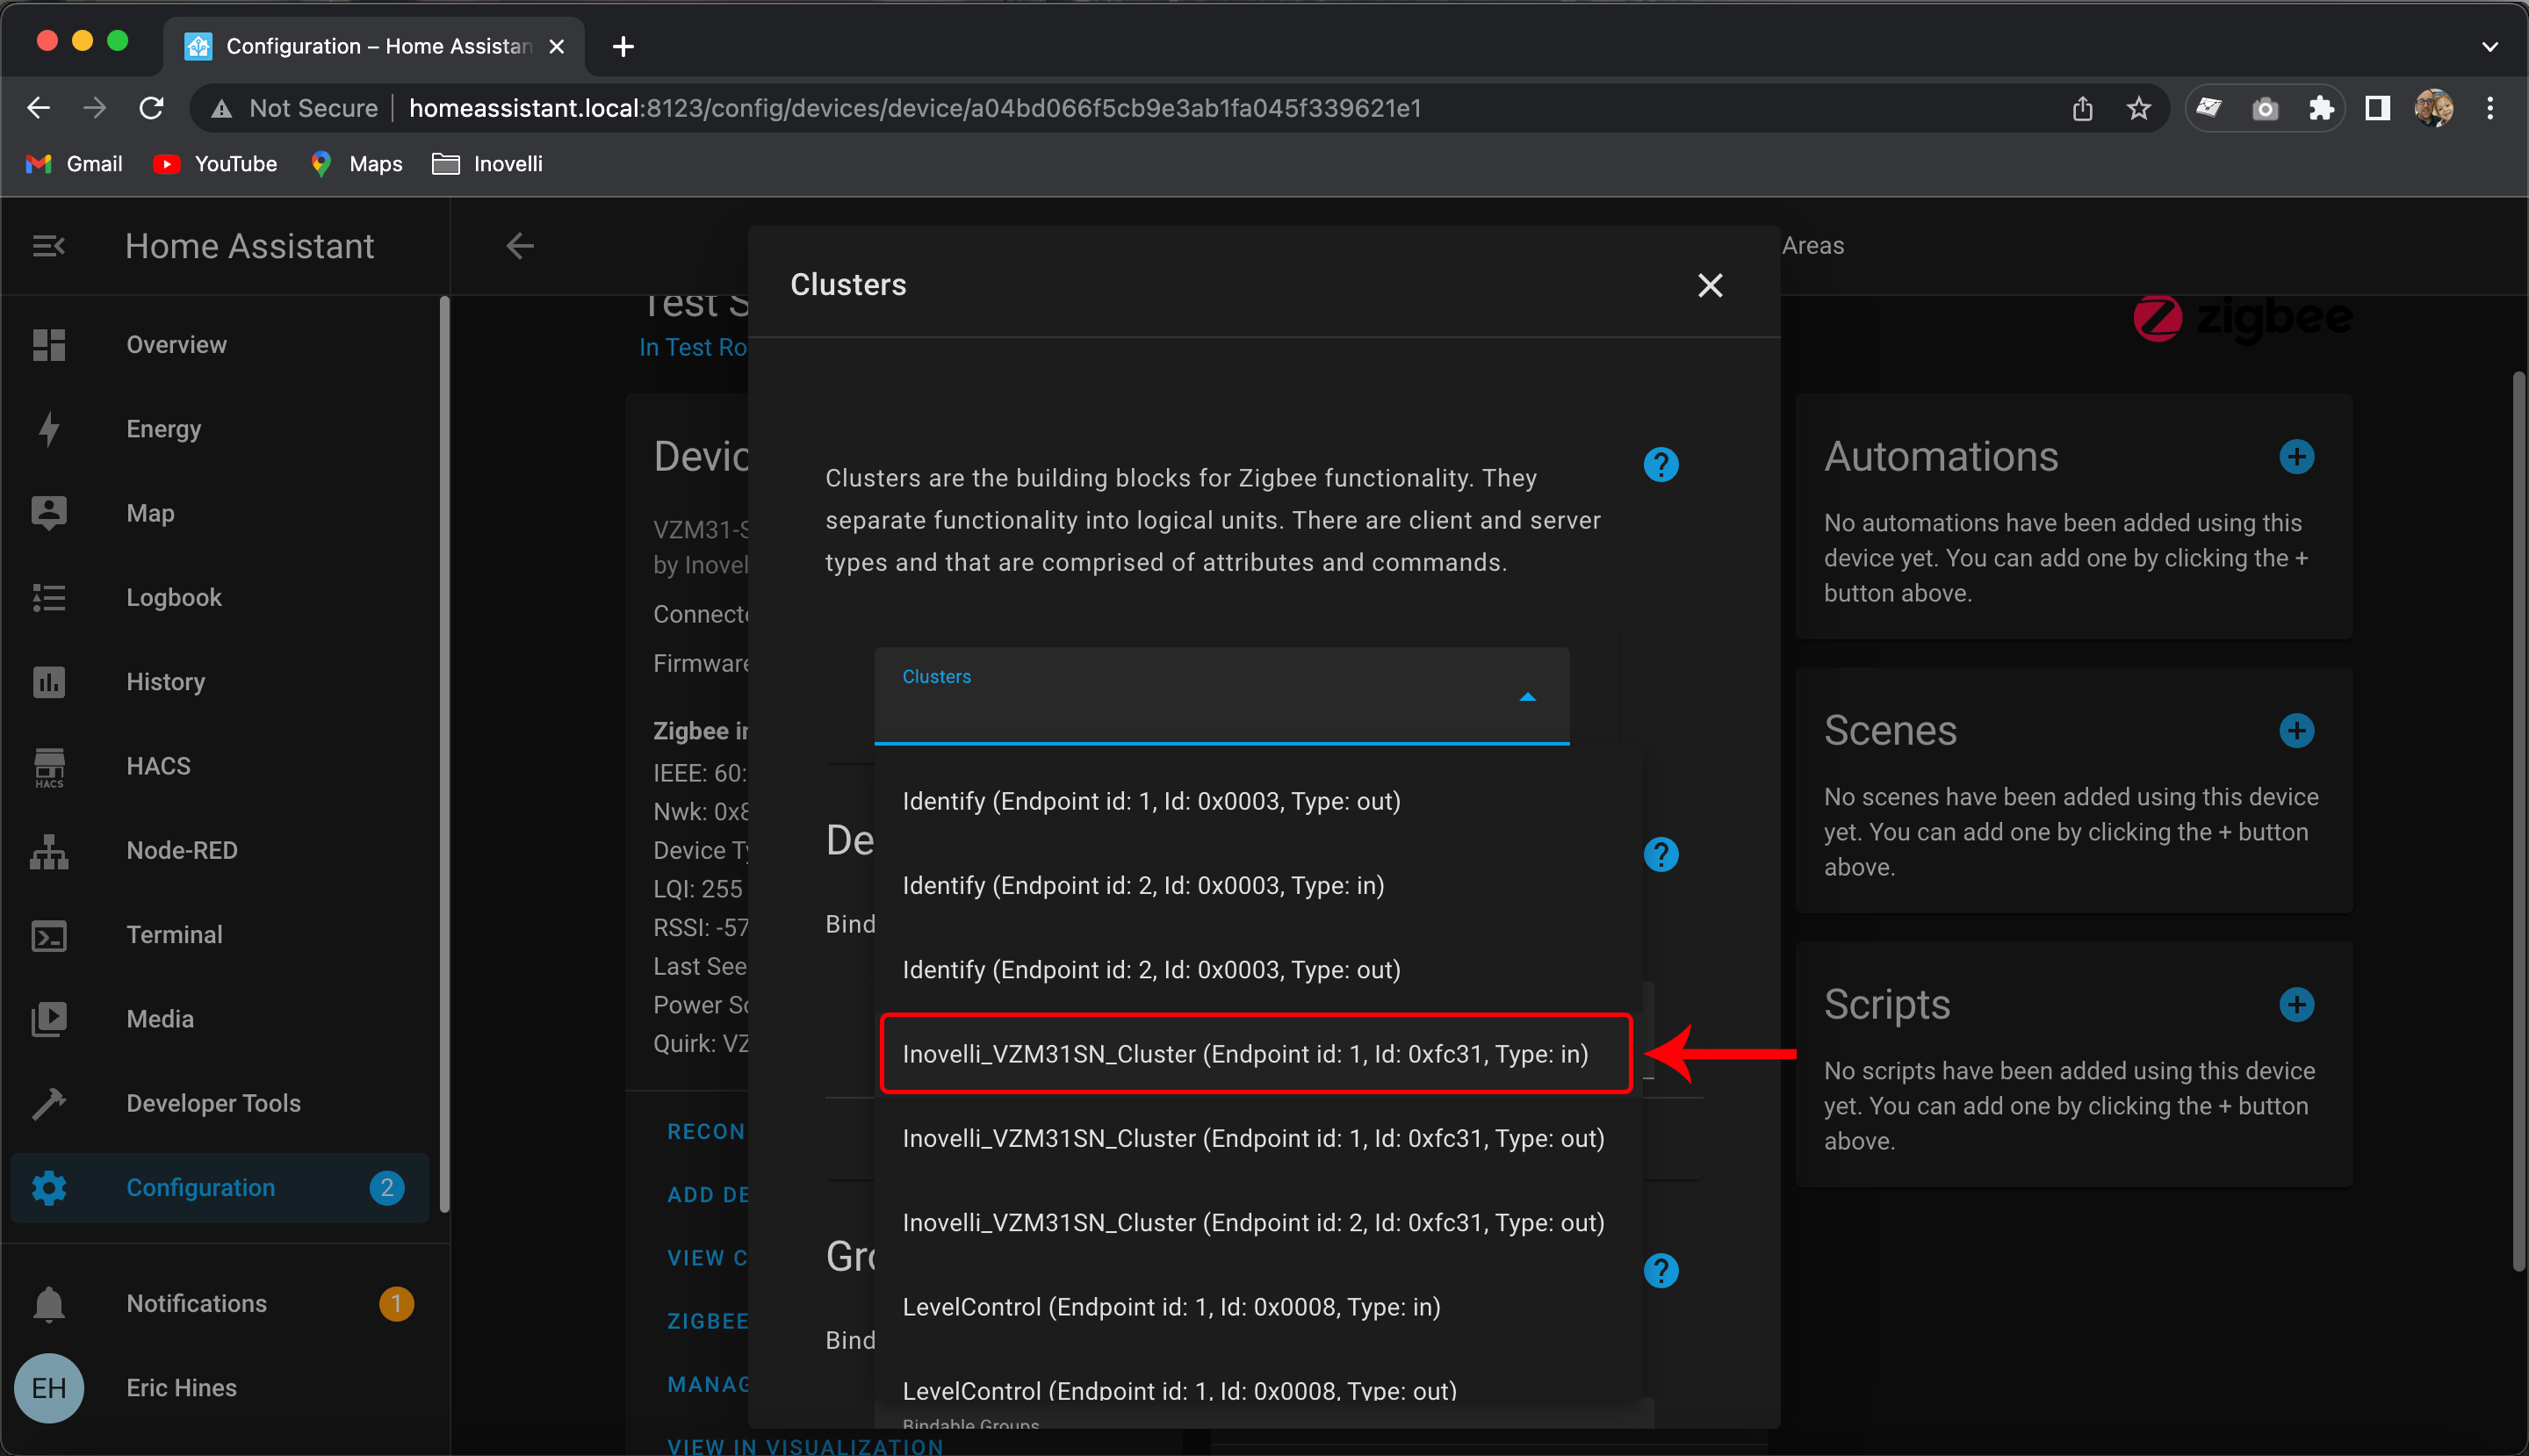
Now we will put your switch in, “Smart Bulb Mode” to maintain power to your bulbs. To do this, click on the, “Clusters” dropdown and select, "Inovelli_VZM31SN_Cluster (Endpoint id: 1, Id: 0xfc31, Type: in)"
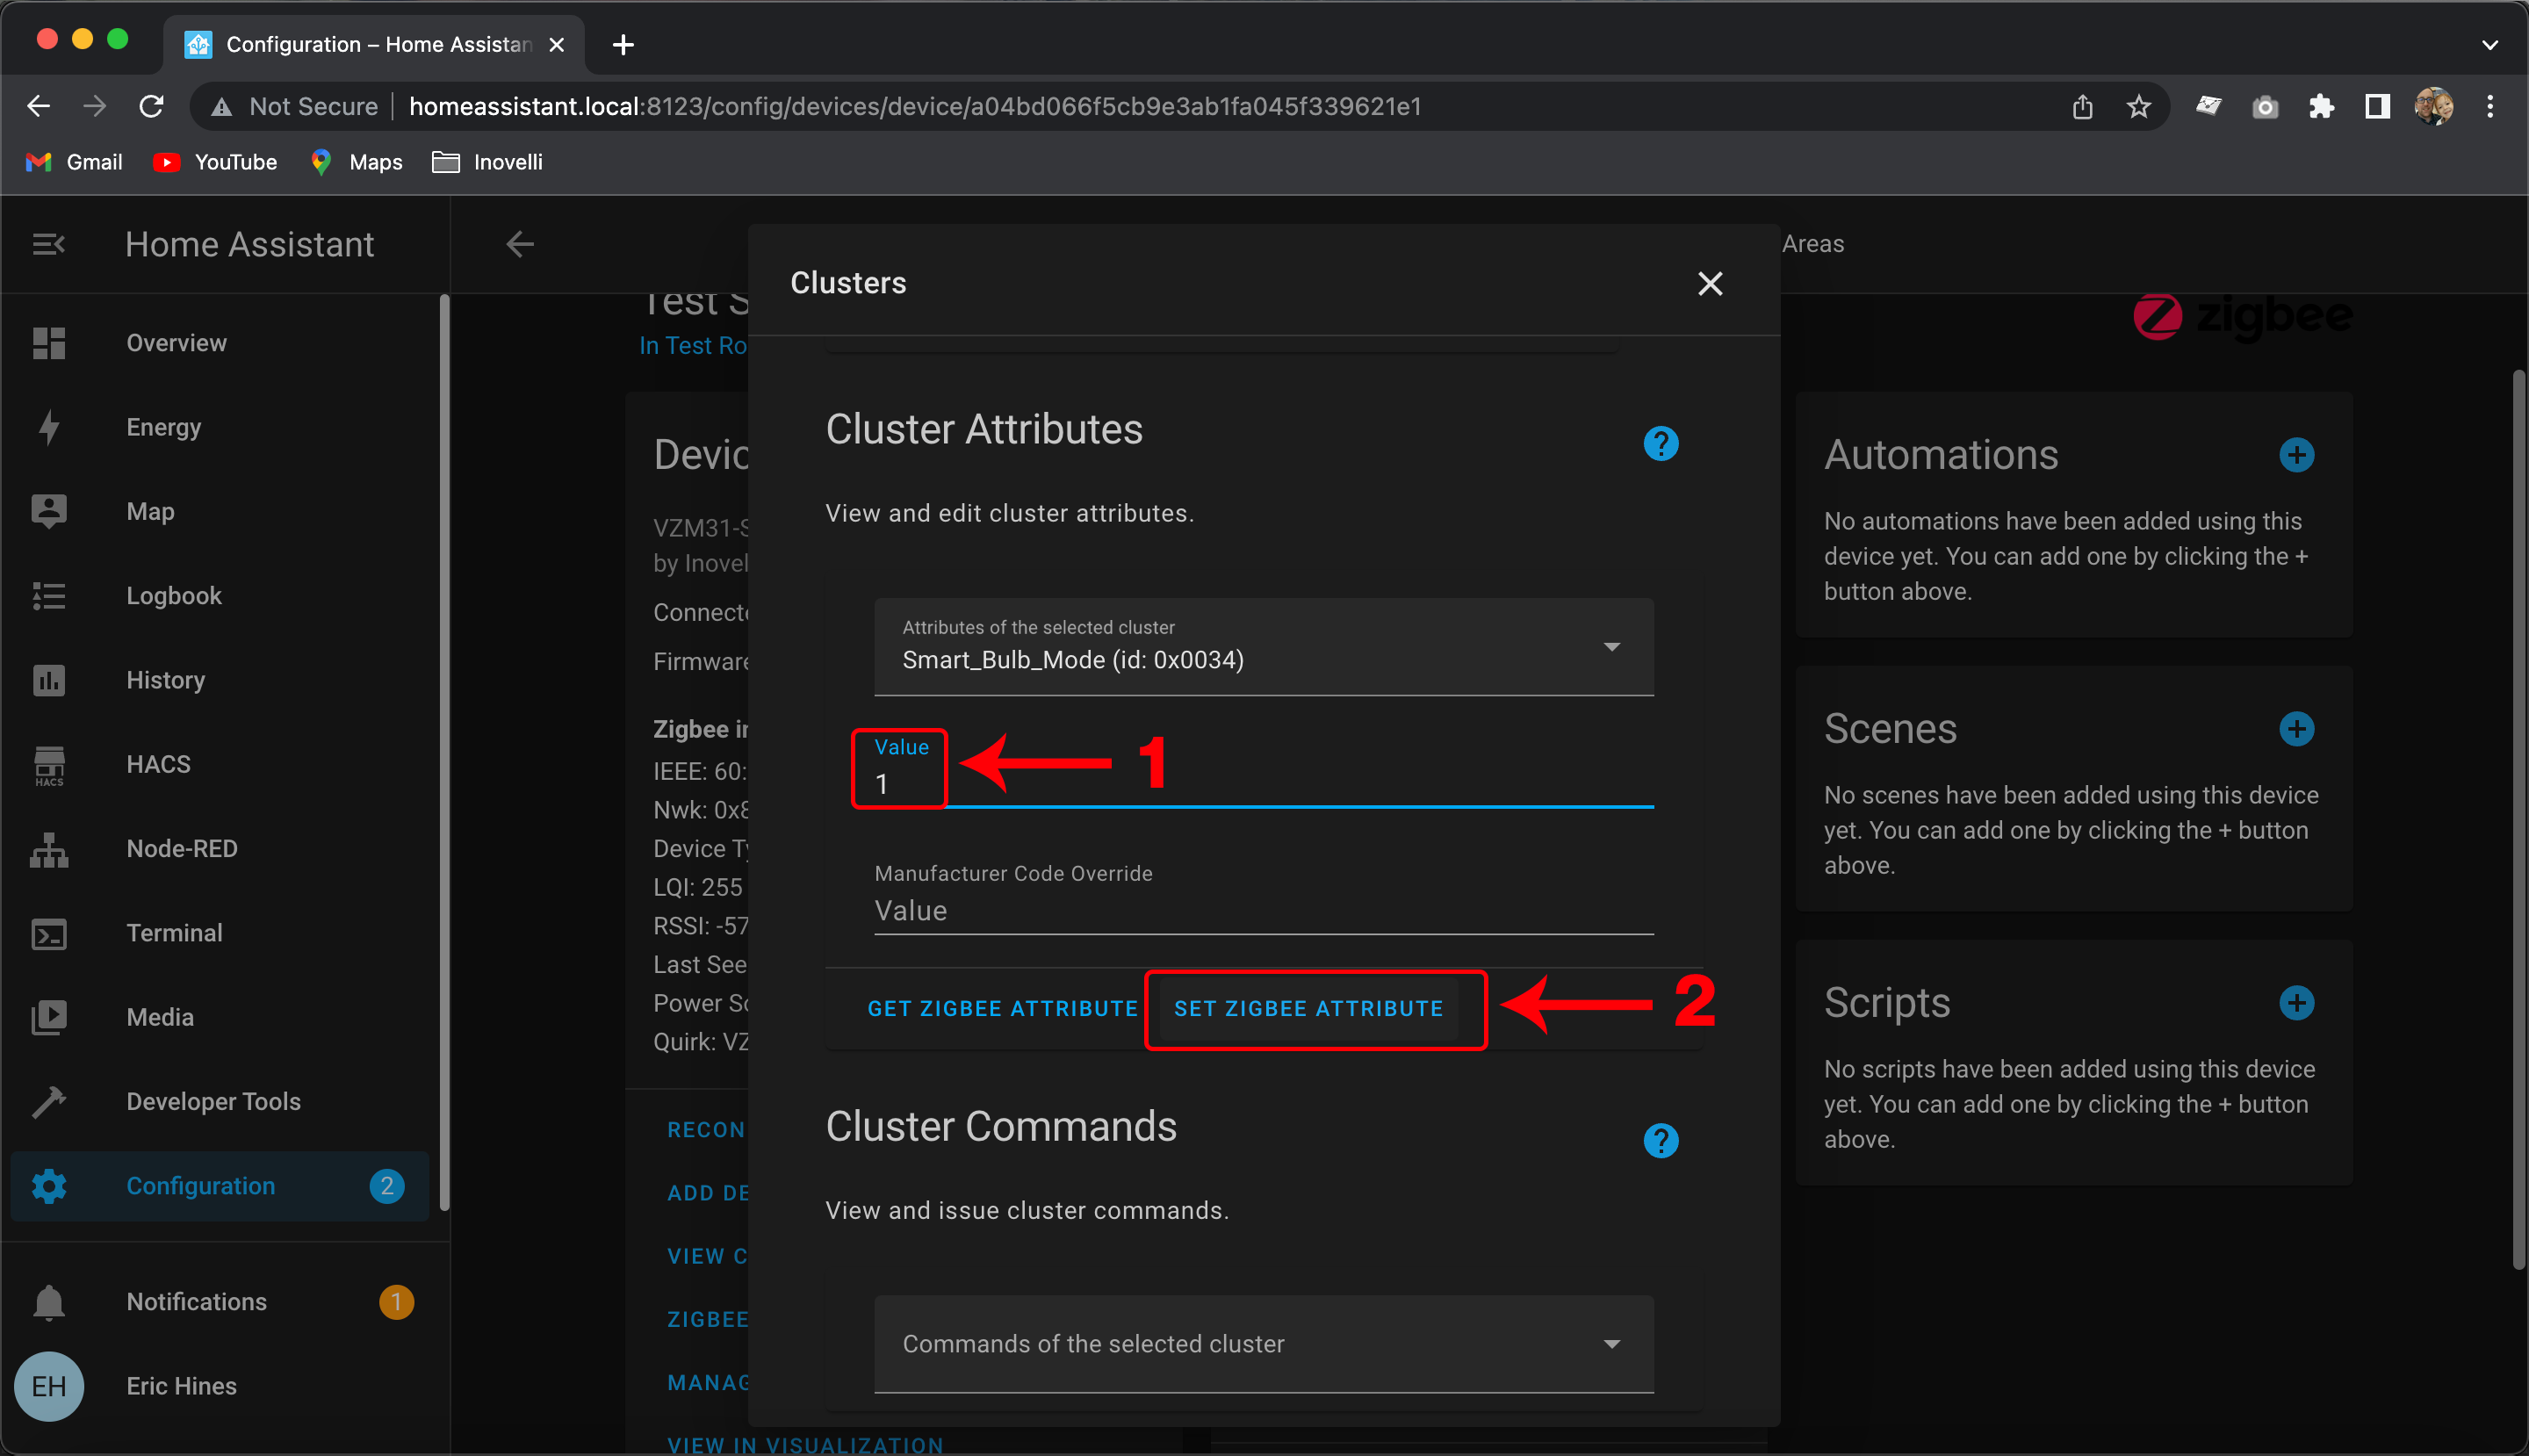
Next, under, “Cluster Attributes” select, “Smart Bulb Mode” and then in the, “Value” box input the number 1 and click, "Set Zigbee Attribute"
Under, “Binding” select the light bulb you would like your switch bound to and click, "Bind"
Test your binding by pressing up on your light switch (your bulb should turn on), pressing down on your light switch (bulb should turn off) or holding up/down on the switch (bulb should dim up/down) - NOTE: If your bulb is not dimming, please make sure you have your switch set to dimmer mode and not on/off.
If you'd like to control the colors from the switch (ie: double-tap to change the bulb to blue, triple-tap to change the bulb to red, etc), check out the instructions for Scene Control
Smart Bulb NOT Wired to Smart Switch
Please note that in this scenario, your smart switch is not wired directly to your smart bulbs and therefore we will not be using Smart Bulb Mode.
Written Instructions
Written Instructions
Open your Home Assistant App (web or mobile) and click on the hamburger menu at the top left
In the hamburger menu, click on, “Configuration” and select, "Devices & Services"
Find your ZHA instance and click on the devices URL (ie: 2 devices, 3 devices, etc)
Click on your light switch and select, "Manage Clusters"
Under, “Binding” select the light bulb you would like your switch bound to and click, "Bind"
Test your binding by turning on/off and dimming your switch – what should happen is that whenever you turn your switch on locally (at the switch) or remotely, the bulb you selected should also turn on/off and dim.
If you'd like to control the colors from the switch (ie: double-tap to change the bulb to blue, triple-tap to change the bulb to red, etc), check out the instructions for Scene Control
Switch to Switch
Please select the dropdown below for instructions. If you have more than two (2) Inovelli Blue Series switches, we recommend Group Bindings for the best experience.
Written Instructions
Written Instructions
Open your Home Assistant App (web or mobile) and click on the hamburger menu at the top left
In the hamburger menu, click on, “Configuration” and select, "Devices & Services"
Find your ZHA instance and click on the devices URL (ie: 2 devices, 3 devices, etc)
Click on your light switch and select, "Manage Clusters"
Under, “Binding” select the light switch you would like your switch bound to and click, "Bind"
Test your binding by pressing up on your light switch (your other light switch should turn on), pressing down on your light switch (other switch should turn off) or holding up/down on the switch (other switch should dim up/down) - NOTE: If your other switch is not dimming, please make sure you have both switches set to dimmer mode and not on/off.
Setup Instructions - Group Binding
We recommend group bindings when there are more than two devices being bound together. If you have two devices, please use individual binding in the section above.
The concept of group bindings is to create a group of Zigbee devices (ie: bulbs or switches) and then bind your switch to the group.
As there are many combinations for Group Binding devices, we created generic instructions below.
Open your Home Assistant App (web or mobile) and click on the hamburger menu at the top left
Click on, “Configuration” and then, "Devices & Services"
Find your ZHA instance and click, "Configure"
Click on the, “Groups” tab and then, “Create Group” at the bottom
Give your group a name (in this case we named it, “Test Group”) and then under the, “Add Devices” section, add the smart bulbs you want in your group – then click, "Create Group"
In the hamburger menu, click on, “Configuration” again and select, "Devices & Services"
Find your ZHA instance and click on the devices URL (ie: 2 devices, 3 devices, etc)
Click on your light switch and select, "Manage Clusters"
Now we will put your switch in, “Smart Bulb Mode” to maintain power to your bulbs. To do this, click on the, “Clusters” dropdown and select, "Inovelli_VZM31SN_Cluster (Endpoint id: 1, Id: 0xfc31, Type: in)"
Next, under, “Cluster Attributes” select, “Smart Bulb Mode” and then in the, “Value” box input the number 1 and click, "Set Zigbee Attribute"
Under, “Group Binding” select whatever you named your group (we named it, “Test Group” in Step 5)
Click on the checkbox that corresponds to, “LevelControl” and, “Endpoint #1” and click, "Bind Group"
Test your binding by pressing up on your light switch (your other devices should turn on), pressing down on your light switch (other devices should turn off) or holding up/down on the switch (other devices should dim up/down) - NOTE: If your other devices are not dimming, please make sure you have the switch set to dimmer mode and not on/off.
Zigbee Bulb Compatibility Chart
We’ve tested Zigbee binding with the following Zigbee products on our switches:
Device | Wattage* | Endpoint | Picture |
60W | 1 | ||
65W | 1 | ||
24W | 1 | ||
4.5W | 1 | ||
4.5W | 1 | ||
N/A | 1 | ||
40W | 11 | ||
40W | 11 | ||
60W | 11 | ||
75W | 11 | ||
100W | 11 | ||
85W | 11 | ||
25W | 11 | ||
25W | 11 | ||
60W | 11 | ||
60W | 11 | ||
60W | 11 | ||
60W | 11 | ||
60W | 11 | ||
60W | 11 | ||
6W | 11 | ||
20W | 11 | ||
12W | 11 | ||
12W | 11 |
DISCLAIMER: As an Amazon Associate Inovelli, LLC earns from qualifying purchases.

